WARNING: Only those who are extremely technologically inclined should attempt repairs on the Wowwee Roboquad. Roboquad is a very sophisticated machine that requires high tech knows how, to perform proper service and repairs. Make sure all batteries are removed before proceeding.
My Roboquad started having leg motor troubles, and grinding servo gears. I have successfully made repairs, and now Roboquad works like new. How did I do It?
I decided it's finally time to tear Roboquad apart for some much needed servicing. As a general rule of mechanics all moving parts need sufficient lubrication. My objective here is to remove Roboquad's leg motors and service the servo gears with lithium grease. A high quality lubrication I use on a lot of my machines. This will extend the life of his leg motors by several years.
But before you can take Roboquad apart you need 4 major tools.
1. A complete set of precision screwdrivers (mainly phillips)
2. One long and skinny regular phillips screwdriver.
3. Disposable plastic wire ties.
4. Lithuim Grease.
Unless you know how the quad was put together in the factory, it can be very hard to get him apart. First you must turn Roboquad upside down and remove all screws from the bottom side. ALL SCREWS or he won't come apart. Most can be removed with the a precision screwdriver. But you'll need the long screwdriver to remove the from the black housing that surrounds the battery compartment. (It is not necessary to open the battery compartment if the batteries have already been removed)
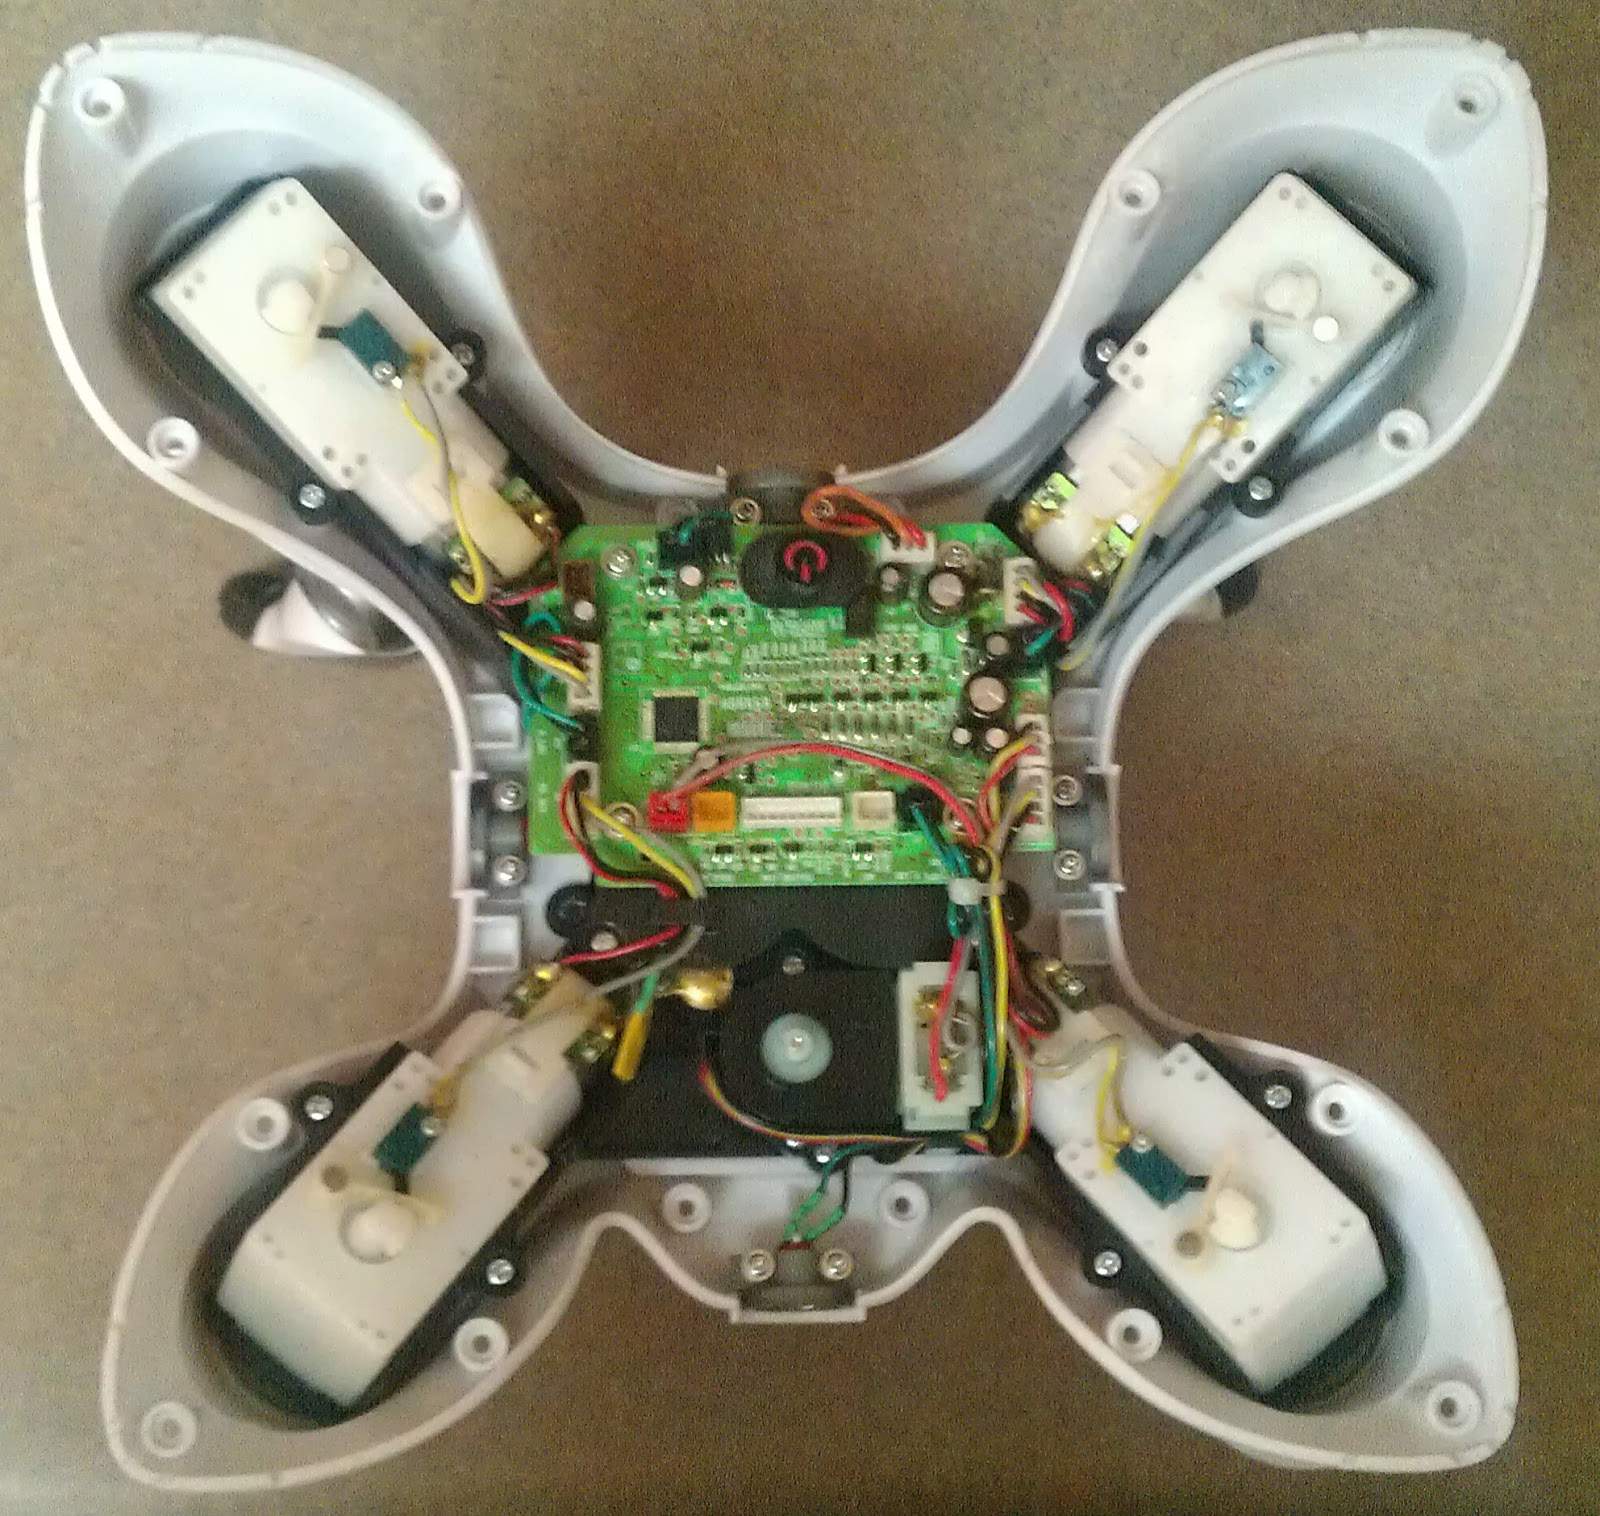
Once all screws are out, put them aside in a safe place where you'll remember them. Turn Roboquad right side up. Next you'll want to disconnect the wire harness of Roboquads head and neck from the main circuit board. Be very gentle while doing this. Any damage to the circuits surrounding the connection could be un-repairable. Once the harness is disconnected, set Roboquad's head and upper body aside.
Now you may proceed to disconnect the rest of the connectors from the main board. Remember to use gentle force. Make a note of how the wires are installed and laid in place throughout Roboquads body so you'll know exactly how to put the wires back in.
Remove the screws that hold the main board in place, clean any dust or dirt off with compressed air, and set it aside.
The support screws for the leg motors are on the underside of the body, where the legs and transparent leg adaptor plate are attached. Remember the order in which you remove the leg motors. Also be very careful to not touch or damage the capacitors that are attached to each motor. Remove the legs first. The motors are held to the servo gearbox by a removal plastic tie. Remove the tie and save it. Service each motor one at a time. Pull the motor out of the servo box and set it aside.
Now this is tricky business so be very careful! Using a precision phillips screwdriver remove the screws from the servo gear box, use a paper envelope to store these screw, they are very tiny, and could be easily lost.
Pull the gearbox apart carefully and try to keep the gears in place. Make a note of the order the gears are installed. Using generic Lithuim ball bearing/grease. (Available at most auto parts store) Apply clean grease to the gears evenly and sparingly. (To much grease could reduce motor life) Re-assemble the gearbox exactly as it came apart, replace screws. Insert the motor into the gearbox, secure with the removable tie, make sure motor is tight, and re attach to Roboquad's body. Reattach legs. Repeat process for all four leg motors and the neck motor. Make sure the bottom servo pivot of the neck motor gearbox is aligned with the neck sensor. Wash and dry your hands completely, never touch circuits with greasy or wet hands. Never allow grease to come in contact with electronic circuitry, as this could cause irreparable damage. Make sure all grease is cleaned off the outside of the servo gear boxes, before reinstalling.
Reassemble Roboquad in the reverse order you took him apart, installing and reconnecting wires in the correct sequence. Use plastic ties. Reinstall the head/upper body and reattach the harness to the correct connection port. Align the neck with the neck motor pivot. Reinstall screws, tighten case closed. Load batteries and test. Hold Roboquad in the air and allow him to do a forward and backward roll. This will work the new lubricate into the gears of the servo boxes. Install fully charged batteries, and play with him until the batteries drain down. This will allow the lubricant to get fully worked into the gears of Roboquad. Congratulations!! Now your Roboquad will run like new for years to come.
By Airomee Wind, Published on Jul 31, 2010
Following is several links that can help you in your assembly and dissemble of the Tribot Robot:
http://www.robocommunity.com/forum/thread/19512/complete-tear-down-and-rebuild-how-to-self-service . . . . . . Wowwee Roboquad Teardown
http://www.robocommunity.com/forum/thread/12535/roboquad-leg-problem . . . . . . Wowwee Roboquad